Monday, October 25, 2010

*Quick note*
I know it has been a while that we've been writing this blog but I still can't figure Blogger text formating out. I think it has a life of its own, 'cuz in every post the spaces between paragraphs are different. *sigh* So don't mind the loooong gaps. Ana.
*End of Quick note*

So what is the the best thing about Halloween?
Dressing up in the most scariest, wildest, funniest, cutest costumes ever?
Scaring others or receiving a fright fest from scary movies, haunted houses, etc?
Eating tons of candy?
All of the above?

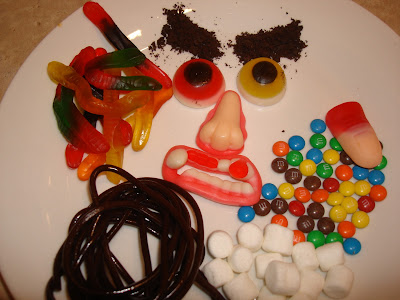
Everybody has a different reason for what makes Halloween so great and even though as adults we (apparently) aren't allowed to collect our own stash of candy, we can find other ways to participate, such as baking our own treats. We turned to the queen of Halloween recipes, Martha Stewart, whose array of creative Halloween recipes from cookies to cocktails got us excited. We baked devil's food and pumpkin cupcakes, which are very fitting for the season, and decorated them into scary spiders and worms. Changes to the recipe are made in italics. Happy baking, and have a very spooky but fun filled Halloween!

Halloween Cupcakes


Spider Cupcakes
Original idea from here


Ingredients


Devil's food cupcakes (See recipe below)
Black sanding sugar (we used chocolate cookie crumbs)
1 bag cinnamon candy (we substituted this with mini red M&M's)
1 bag marshmallows
1 bag black licorice (we substituted this with No Name grape flavoured string candy)


Directions
1. Make Devil's food cupcakes.


2. Ice mini cupcakes with whipping cream (or your favourite icing) and coat with sanding sugar/chocolate cookie crumbs. Use cinnamon candy/mini M&M's for eyes. For legs, attach 8 pieces of black licorice/grape string candy. For fangs, cut out tiny cone shapes from a marshmallow and attach.


*Devil's Food Cupcakes
From here

Ingredients


3/4 cup unsweetened Dutch-process cocoa powder (we used regular cocoa powder)
3/4 cup hot water
3 cups all-purpose flour
1 teaspoon baking soda
1 teaspoon baking powder
1 1/4 teaspoon coarse salt (We used regular table salt)
1 1/2 cups (3 sticks) unsalted butter
2 1/4 cups sugar
4 large eggs, room temperature
1 tablespoon plus 1 teaspoon pure vanilla extract
1 cup sour cream, room temperature


Directions


1. Preheat oven to 350 degrees. Line mini muffin tins with paper liners. Whisk together cocoa and hot water until smooth. In another bowl, whisk together flour, baking soda, baking powder, and salt.


2. Melt butter with sugar in a saucepan over medium-low heat, stirring to combine. Remove from heat, and pour into a mixing bowl. With an electric mixer on medium-low speed, beat until mixture is cooled, 4-5 minutes. Add eggs one at a time, beating until each is incorporated, scraping down sides of bowl as needed. Add vanilla, then cocoa mixture, and beat until combined. Reduce speed to low. Add flour mixture into two batches, alternating with the sour cream, and beating until just combined after each.


3. Divide batter evenly among lined cups, filling each 3/4 full. Bake, rotating thins halfway through, until a cake tester (or a toothpick) inserted in centers come out clean, about 20 minutes. Transfer tins to wire racks to cool 15 minutes, turn out cupcakes onto racks and let cool.

*We don't exactly know how much this recipe yields and it is not specified on the site. See Ann's comment below.


Pumpkin Cupcakes
From here
Makes 18 (We halved the recipe and ended up with 12)


Ingredients


2 cups all-purpose flour
1 teaspoon baking soda
1 teaspoon baking powder
1 teaspoon coarse salt (or table salt)
1 teaspoon ground cinnamon
1 teaspoon ground ginger
1/4 teaspoon freshly grated nutmeg (we omitted this ingredient. Why? We simply didn't have any.)
1/4 teaspoon ground allspice (we omitted this one too, same reason as the nutmeg)
1 cup packed light-brown sugar
1 cup granulated sugar
1 cup (2 sticks unsalted butter, melted and cooled)
4 large eggs, lightly beaten
1 can (15 ounces) pumpkin puree

Halloween themed candy, orange and black jelly beans, sprinkles, etc...
Whipping cream, or your favourite icing. May we suggest the maple cream cheese frosting that we used in our pumpkin cake recipe.


Directions


1. Preheat oven to 350 degrees. Line cupcake pans with paper liners; set aside. In a medium bowl, whisk together flour, baking soda, baking powder, salt, cinnamon, ginger, nutmeg, and allspice; set aside.


2. In a large bowl, whisk together, brown sugar, granulated sugar, butter, and eggs. Add dry ingredients, and whisk until smooth. Whisk in pumpkin puree.


3. Divide batter evenly among liners, filling each about halfway. Bake until tops spring back when touched, and with a toothpick inserted in the center comes out clean, 20-25 minutes, rotating pans once if needed. Transfer to a wire rack; let cool completely.


4. Spread whipping cream/frosting and decorate with desired candies.


Ann's Thoughts


57: Ana and I ended up making fifty-seven cupcakes! There were cupcakes everywhere, on the desk, by the fireplace mantle, on the dinning room table, all over the kitchen, I wouldn't be surprised if there are a few cupcakes hiding in Ana's bedroom. I partly blame this on Martha Stewart. She or whoever published the devil's food cupcake on her site did not record how much cupcakes the batter contained, and it did not occur to us until added 1 1/2 cups of butter, and over 2 cups of sugar which seemed suspiciously a lot. We ended up making what seemed like an endless supply of devil's food cupcakes- it was like we were punked.


The theme for these Halloween cupcakes was bugs which consisted of spiders and worms....so worms aren't really scary at all, but when we saw an image of cupcakes infested with gummy worms it was too cute not to do. Decorating these cupcakes reminded me of doing arts and crafts in elementary school. The only thing is that it's not as easy as Ms. Martha makes it look. The legs for the spiders either fell off, destroyed the cupcake as we kept poking holes in them, or just looked weird. Ana was able to make only one pair of fangs our spiders because it was so time consuming. The worms were easier to make. Ana being the smart cookie that she is, inserted toothpicks inside the gummy worms and gently pushed them into the cupcakes so it looks like they are digging themselves inside the cupcakes.

This week I felt the emphasis was on decorating, however the devil's food cupcakes were literally sinfully delicious! Our pumpkin cupcakes were also really good. We didn't get a chance to decorate them (they were simply too many cupcakes to decorate) but they are the best pumpkin cupcakes I've ever tasted.


Ana's Thoughts


Oh Halloween, I wish you were a tradition in my country, too. Then I could eat...err have all the candies to decorate these cupcakes every year. Please come to my country. I'd appreciate it. Thank you.


Ok, enough with the wishful thinking. haha Making and decorating these cupcakes was really fun! The cupcakes themselves were pretty straightforward - be aware that if you choose to make the full recipe you'll end up with more than 50 cupcakes! We chose two different recipes, a pumpkin and a devil's food cupcake. A devil's food, how appropriate. Haha. We here at OSSD think about every detail. Anyway, they were really tasty, specially the pumpkin. Mmmm


I had so much fun decorating them! I wanna do it again!


The only problem for us this week was the pictures. We usually do all the photo shoots with natural light but this week we had to do it inside the house because it was already dark outside, not to mention cold. So they didn't turn out the way we wanted. =S


Anyway, Happy Halloween!! Eat lots of candy, dress up with a funky costume and make these cupcakes!

See you next week. ;)


Receitas em Português


Devido à preguicite aguda, essa semana não postarei as receitas traduzidas. Se tiver interesse por alguma das receitas (Cupcakes de abóboras ou Cupcakes de Chocolate) é só deixar um comentário abaixo. =)

Monday, October 18, 2010

This week on Oh So Sinfully Delicious we've decided to change things up a bit, so instead of baking up a concoction of deliciousness, we wanted to become food critics for a day. The lucky restaurant that we've chosen to review this week is Boom Breakfast & Co, the perfect place to have brunch with family, friends, or even solo.


Ann's Thoughts


One day, last long weekend, three fabulous ladies were sitting comfortably at Boom Breakfast & Co, sipping lattes, catching up on the latest gossip, and relaxing as they watched stylishly dressed Torontonians stroll by Boom. This is how the setting was, as Ana, my friend S, and moi, got together to try out what Boom had to offer. Now, I've always wanted to go to this restaurant since the day it opened on St. Clair West Ave . It feels and looks like a typical brunch restaurant, with leather booths that give it that 1950s diner feel, and stools by one side of the restaurant for those who eating solo, or on the go.

The majority of the meals served in boom are egg based dishes, which is kind of a problem for me since I don't like eating eggs directly. Of course for those who abhor the dairy product, Boom does provide other food such as pancakes, waffles, pasta, burgers and sandwiches. I chose Boom's Blueberry Pancakes, while my friend S ordered the Strawberry and Banana Pancakes drizzled with chocolate sauce. Ana got an egg dish, which she'll give her thoughts on below. The service was great, the staff were super friendly, but my pancakes were a disappointment. I found them on the dry side partly because I didn't have any syrup with them. So why didn't I have any syrup? Because you had to pay for the syrup, which I personally don't think is fair. My friend S on the other hand received an amazing display of pancakes topped with a generous amount of sliced strawberries and bananas. It looked so good, and she said that it tasted really good too. Overall brunch at Boom was OK but I don't think I'll be going back there any time soon.

Service: 9. The staff were really nice and patient to diners despite the increasingly long line up of people waiting for a table.
Food: 6. So I'm being totally biased here cause I only ate the blueberry pancakes (without any maple syrup, or any sugary condiment at all!) but I'll take my friend and Ana's word that their meals were tasty and their lattes were pretty good.
Price: 7. The prices were pretty average.
Atmosphere: 8. Nice place to chill out with the ones you love.


Ana's Thoughts


Hmmm brunch. One of my favorite meals. I mean, what could be better than toast, eggs, bacon, pancakes, fruits, and fries, all in one meal? Nom nom nom.


As you can see from the pic above I chose the typical brunch dish. The presentation was okay and the portions were perfect. You can eat everything and feel satisfied without having to unbutton your jeans. The toasts were perfectly toasted and the fries were crisp on the outside and soft on the inside. They were seasoned with oregano or another herb like that. It was a good change from the regular salt-and-black-pepper. You would think that with so many egg dishes on their menu they are experts in eggs or something like that but mine were tasteless. Nothing a dash of salt couldn't fix but still, I expected more from them. But then again, there's so much you can do with scrambled eggs, right? My pancakes were fluffy and light but with no flavour. A syrup would've been perfect. You HAVE to have syrup with your pancakes, so why we have to pay for it? No points for you Boom.


All in all, my meal was okay.The staff were very friendly and our waitress was very patient with us and didn't rush us to choose or to leave the restaurant, even though there were a line of people waiting to be seated. I would go back there again, but to try their pasta or sandwich dishes.

Service: 9. Friendly staff and fast serving.
Food: 7. Good presentation and portions.
Price: 7. Reasonable prices.
Atmosphere: 9.5. Diner look. Love it.


1036 St Clair W. (@Glenholme Ave)
Toronto
Olá!! Ana here. Somewhere in the blogosphere I read that today is the National Chocolate Cupcake Day. How awesome is that?! A day to celebrate cupcakes. Yumy! Even though I think by National they mean only in USA, why can't we, Canadians or Brazilians or even better the whole world, celebrate this day, too? 

So we here at OSSD decided to get in the spirit and post a cupcake recipe for you guys. And these cupcakes are special because they come straight from Brazil! Made by my lil' sis B. =) So go on and have a cupcake. Enjoy.

Happy Cupcake Day!!!


The recipe for the cupcakes were taken from here. (If you want the english version just ask me.;) ) 
The chocolate frosting was taken from here.


Thanks for the lovely cupcakes B!! =D
Stay tunned for our new post, later today. ;)

Monday, October 11, 2010

This week on Oh So Sinfully Delicious, we decided to make the ubiquitous whoopie pie, a baked goodie that has made an appearance on every die hard food blogger. So for those who have not heard of the whoopie pie, what exactly is it? A cookie? Cake? Some sorta pie? Well we aren't sure, but what we do know for sure is that they are seriously good. The recipe below was taken from the super cute blog, Bakerella. Bakerella got this particular recipe from the cookbook, Whoopie Pies: Dozens of Mix 'em, Match 'em, Eat 'em Up Recipes, by Sarah Bilingley and Amy Treadwell. For the filling we used a cream cheese filling taken from Cookstr (It's basically the same from our Pumpkin cake). Any changes we've made to the recipe are written in italics. Happy Baking!


Classic Chocolate Whoopie


1 2/3 cups all-purpose flour
2/3 cup unsweetened cocoa powder
1 1/2 teaspoons baking soda
1/2 teaspoon salt
4 tablespoons unsalted butter, room temperature
4 tablespoons vegetable shortening (we did not have any veggie shortening on hand so we just doubled the amount of butter to 8 tablespoons)
1 cup packed dark brown sugar
1 egg
1 teaspoon vanilla
1 cup milk

Directions

1. Preheat oven to 375 degrees.

2. Line baking sheets with parchment paper. (Wax paper is just as effective)

3. In a bowl, sift together flour, cocoa, baking soda, and salt.

4. In another bowl, beat butter, shortening (if you are using it), and sugar with a mixer on low until just combined. Increase speed to medium and beat for about 3 minutes. The good old wooden spoon was our mixer, it's retro but it works!

5. Add half of the flour mixer and half of the milk and beat on low until incorporated. Repeat with remaining flour and milk and beat until combined.

6. Using a tablespoon, drop batter on baking sheet two inches apart. Bake for about 10 minutes each or until pies spring back when pressed gently. Ours took less than 10 minutes. Keep an eye on them after 5.

7. Remove from oven and cool for about five minutes before transferring them to a rack to cool completely.

1 Tablespoon of batter should make about 48 two-inch cakes of 24 pies.

2 Tablespoons of batter should make about 30 four-inch cakes of 15 pies.


Cream Cheese Filling*

3 cups confectioners' sugar
1/2 cup (1 stick) unsalted butter, softened
8 ounces cream cheese, softened
1 teaspoon pure vanilla extract

Directions

Sift the confectioners' sugar into a medium bowl and set aside.

In the bowl of an electric mixer fitted with the paddle attachment, beat the butter until it is completely smooth, with no visible lumps. Add the cream cheese and beat until combined. (Once again, totally do-able without a mixer)

Add the confectioners' sugar and vanilla and beat until smooth. Be careful not to overbeat the filing, or it will lose structure.

*We halved the recipe

Dolce de Leche filling
Assemble the Whoopie Pies (Directions taken from Cookstr):

1. Turn half of the cooked cookies upside down (flat side facing up.)

2. Use an ice cream scoop or a tablespoon to drop a large dollop of filling onto the flat side of the cookie. Place another cookie, flat side down, on top of the filling. Press down slightly so that the filling spreads to the edges of the cookie. Repeat until all the cookies are used. Put the whoopie pies in the refrigerator for about 30 minutes to firm up before serving.

3. The whoopie pies will keep for up to 3 days, on a parchment-lined baking sheet covered with plastic wrap, in the fridge.

Ann's Thoughts

Now I have to admit, that for a girl who loves to bake, I've never heard about whoopie pies. It was Ana who introduced me to these treats. American in origin, they seem to be gaining more popularity, and according to Ana, these are supposedly the new cupcakes. So which is better, cupcakes or whoopie pies? At first I had agreed with Ana that whoopie pies are better, but it's really hard to decide because they are so different that you really can't compare the two. What's cool about whoopie pies is that they have this cake-like texture that are shaped into cookies, I can think of tons of different whoopie pies to make, like an espresso version with a mocha filling, a cookie dough one with a vanilla cream filling, or what about a banana with a chocolate chip filling? I could go on with this but I'll let you guys try the classic chocolate version and let your imaginations create new possible flavours and whoopie pie combinations.

Ana's Thoughts

Two little chocolate cakes filled with cream cheese filling = Whoopie Pies.

Whoopie Pies =100% Yumminess. That's a fact (just look at the pictures. haha).

When you are craving for chocolate cake and can not or do not want to wait for 2 hours just make whoopie pies instead. The whole process, from sifting the flour to filling the whoopies, took 45-50 min. The whoopies themselves took less than 10 min. to bake.

It was so fast and so simple and the result was so sinfully delicious! =) The cakes are so light and airy it melts in your mouth. The bitterness of the cocoa contrasts perfectly with the sweetness of the cream cheese filling. Yum yum! There are two left in the fridge and I am using all my self-control to not eat them all and leave them for my housemate. E., hurry up or you won't get to taste them! ;)

Bake on people!
'Til next week. ;)
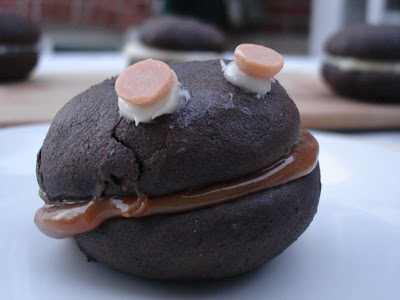
Our little Whoopie Monster! Watch out, he may cause addiction!
Receita em Português:

1 2/3 xíc. de farinha
2/3 xíc. cacau em pó, sem adição de açúcar
1 1/2 colher (chá) de bicarbonato de sódio
1/2 colher (chá) de sal
4 colheres (sopa) de manteiga sem sal, temperatura ambiente ( 57g)
4 colheres (sopa) de gordura vegetal (57g) (pode ser substituída por manteiga)
1 xíc. de açúcar mascavo, aperte na xícara antes de medir
1 ovo
1 colher (chá) de baunilha
1 xíc. de leite

Modo de preparo

1. Pré aqueça o forno a 190ºC. Forre uma assadeira de beiradas baixas com papel manteiga.
2. Peneire a farinha, o cacau, bicarbonato e o sal.
3. Numa outra tigela, bata a manteiga, gordura vegetal e o açúcar em velocidade baixa até combinar. Aumente a velocidade para média e bata por mais 3 minutos. Adicione o ovo e a baunilha e bata por mais 2 minutos.
4. Acrescente metade da mistura de farinha e metade do leite e bata em velocidade baixa até ficar homogêneo. Repita o processo.
5. Com uma colher de sopa faça bolinhas e coloque na forma, deixando um espaço entre elas. Leve para assar por 10 minutos ou até que pressionados, não afundem. Os nossos bolinhos assaram em menos de 10 minutos. Fique de olho após 5 minutos.
6. Retire do forno e deixe descansar na forma por 5 minutos e deixe esfriar por completo em uma grade.

Recheio:

Usamos o mesmo recheio do bolo de abóboras.


Monday, October 4, 2010

On October 11, 2010, Canadians will be celebrating Thanksgiving, a day where one is suppose to reflect on what he or she is thankful for, but really it is a day to stuff oneself full of turkey, mashed potatoes, pot roast, glazed ham, and so on. However, Thanksgiving cannot be complete without the iconic pumpkin pie. Thus this week, we've made pumpkin cake. A recipe posted by Jennifer on allrecipes.com (the Canadian version). We've paired this recipe with a maple cream cheese frosting, which can be found on Culinary Concoctions by Peabody. Any changes we've made to the recipe are in italics. Happy baking, and for those celebrating Thanksgiving, have a happy Thanksgiving ya'll!

Pumpkin Cake II


1 1/2 cups vegetable oil (We used 1 cup of unsweetened applesauce, see Ann's comment below)
2 cups white sugar
4 eggs
3 cups all-purpose flour
2 teaspoons baking soda
2 teaspoons baking powder
3 teaspoons ground cinnamon
1 teaspoon salt
2 cups solid pack pumpkin puree
1/2 cup chopped walnuts (we omitted the walnuts)


Directions:


1. Preheat oven to 375 degrees F. Grease and flour a 10 inch tube pan. Sift together flour, baking soda, baking powder, cinnamon, and salt. Set aside.

2. In a large bowl, combine oil (or applesauce) and sugar. Add eggs one at a time and mix well. Add the flour mixture and beat until smooth. Add nuts and pumpkin and blend until smooth. Pour batter into greased 10 inch tube pan.

3. Bake at 375º F (190º C) for 1 hour or until a toothpick inserted into the centre of the cake comes out clean. Cool in pan for 10 minutes, then turn out onto a wire rack and finish cooling. Dust with confectioners sugar before serving. (This is optional, we used maple cream cheese frosting instead, see the recipe below.)


Maple Syrup Cream Cheese Filling*


3 cups powdered sugar
1/2 cup unsalted butter, at room temperature
8 ounces cream cheese, at room temperature
3 tablespoons maple syrup
1 teaspoon vanilla


Directions:


1.In the bowl of an electric mixture fitted with a paddle attachment, beat the butter until smooth with no visible lumps. (You can totally do this with a bowl, wooden spoon, and your arm).

2. Add the cream cheese and beat until combined.

3. Add the powdered sugar, maple syrup, and vanilla, and beat until smooth. Be careful not to over beat the filling, or it will lose structure.

* We halved the recipe because we wanted to spread the frosting on top of the cake but if you want to spread it around the side of the cake then feel free to use the full amount.


Ann's Thoughts

I've made this cake a few times in the past, following the ingredients exactly as posted. However what bothered me was how oily the cake turned out, cause if you've noticed, this recipe calls for a whopping amount of one and a half cups of oil - that's seriously fattening. What's so great about allrecipes.com is that many baking enthusiast not only vote on the recipe, but comment and make suggestions on how to make the recipe better or slightly different. One suggestion that's been made by allrecipes members is to substitute the oil for 1 cup of applesauce. So Ana and I used unsweetened applesauce instead, and the cake turned out really, really good. So good, that my share of the cake is already finished! This pumpkin cake is an awesome addition to any Thanksgiving feast, people will be asking for seconds, trust me.

Ana's Thoughts

I wish we had Thanksgiving in Brazil, too. Then I would have another excuse to bake AND stuff my face with food. As if Christmas' Eve, Christmas Day, New Year's Eve and New Year's feasts weren't enough. hahaha But I guess if we had Thanksgiving it wouldn't be the same because October is Spring in Brazil, so our table would be filled with Spring food not Fall food. Anyway, back to Pumpkin cake. My very first Pumpkin cake. At first, I thought it was okay. Not bad, the cinnamon overpowered the pumpkin but you could still taste a little bit of it, the cake was moist, not oily. The frosting wasn't my favorite, though. Too sweet for my taste.

But the next day, I tried another piece, with the frosting still cold from the fridge, and Oh my...it was so good. The cake was still moist and the cold, sweet and tangy, frosting was the perfect combination. I think some cakes are better the next day and this was the case for the Pumpkin cake, in my opinion. Now I want to taste pumpkin pie, pumpkin cheesecake, pumpkin everything. So I better get started...See you next week! ;)


Receita em Português:


Bolo de Abóboras


1 1/2 xíc. de óleo vegetal*
2 xíc. de açúcar
4 ovos
3 xíc. de farinha
2 col (chá) de fermento em pó
2 col (chá) de bicarbonato de sódio
3 col (chá) de canela em pó
1 col (chá) de sal
2 xíc. de purê de abóboras**
1/2 xíc de nozes, picadas


Pré- aqueça o forno a 190ºC. Unte e enfarinhe uma forma com furo no meio. Peneire a farinha, o fermento, bicarbonato, canela e o sal. Reserve.
Em uma tigela grande, junte o óleo e o açúcar. Acrescente os ovos, um por vez, misturando bem. Acrescente a mistura de farinha e misture bem, até estar bem homogêneo. Adicione as nozes e a abóbora, misturando bem.
Asse por 1 hora ou até que um palito saia limpo quando inserido no centro do bolo. Deixe esfriar por 10 min na forma, desenforme e deixe esfriar por completo. Polvilhe açúcar de confeiteiro antes de servir, ou sirva com cobertura de Maple e cream cheese (receita abaixo).


Cobertura de xarope de bordo e cream cheese***


3 xíc. de açúcar de confeiteiro
1/2 xíc (115g) de manteiga sem sal, em temperatura ambiente
250g de cream cheese, em temperatura ambiente
3 col (sopa) de xarope de bordo (Maple syrup)
1 col (chá) de baunilha


Bata a manteiga até ficar cremosa. Adicione o cream cheese e bata até ficar homogêneo.
Acrescente o açúcar, o xarope e a baunilha e bata até obter um creme. Cuidado para não bater demais ou ela perderá sua estrutura. Leve para gelar por 30 min.


*Nós substituímos o óleo por 1 xíc bem cheia de applesauce, ou purê de maçãs. Se for usar óleo, aconselho somente 1 xíc. para não ficar oleoso.
**Nós usamos abóboras já prontas e enlatadas sem adição de açúcar e sólida (sem líquido). Acredito que se você cozinhar abóbora moranga e depois amassá-la, será a mesma coisa.
***Nós fizemos somente meia receita.