Monday, December 13, 2010

For the past four and a half months, we have showcased our baking experience on our blog. It's been quite an experience as we have tried recipes from around the world, from North to South America; produced holiday treats, such as Halloween and Christmas (see recipe below), made some celebratory treats (remember cupcake day?) and even meet a celebrity baker (see last week's post) we are closing a chapter in Oh So Sinfully Delicious by making our last baked good...

...in Canada. Ana will be going back home to Brazil, however, I (Ann) will join her where we'll continue baking more recipes. However, before we leave this great, but cold country, we couldn't possibly leave without doing some Christmas baking. This week we decided to do a classic with a twist-Chai Gingerbread Cookie. This recipe was taken from Chatelaine 2010 holiday cookie collection. These cookies are simply amazing and would make a great addition to your holiday feast.

Chai Gingerbread Cookie
From here
2 1/2 cups all-purpose flour
2 tsp ground ginger
1 1/2 tsp cinnamon
1/2 tsp salt
1/2 tsp baking soda
1/2 cup unsalted butter, melted
3/4 cup brown sugar
1 egg
1/3 cup fancy molasses
1 chai-tea bag

Directions

  1. In a large bowl, using a fork, stir flour with spices and baking soda. Slit open a chai-tea bag. Stir 1 tbsp (15 mL) of the leaves into flour mixture along with spices. In a medium bowl, using a wooden spoon, beat butter with sugar for 2 min. Beat in egg, then molasses. Make a well in centre of flour mixture, then pour in molasses mixture. Stir until most of molasses is absorbed. Gently knead until dough is an even colour. Divide into 4 portions
  2. Shape each into a ball, then flatten slightly into a disc . Wrap separately with plastic wrap and refrigerate until firm, at least 30 min or up to a week. Or overwrap with foil and freeze up to 1 month.
  3. When ready to bake, remove dough from refrigerator. Let stand at room temperature until soft enough to roll, 5 to 10 min. Preheat oven to 350F (180C). Lightly spray or oil a baking sheet. Place a disc of dough between 2 sheets of waxed paper. Roll dough no thicker than ¼ in. (0.5 cm). Cut out shapes with cookie cutter. Place on baking sheet about 1 in. (2.5 cm) apart.
  4. Bake in centre of preheated oven just until edges begin to darken, 7 to 10 min. Remove cookies to a rack to cool. Repeat with remaining dough. Store in an airtight container in a cool place up to 1 week or freeze up to 1 month.


Ann's Thoughts

Well what can I say, we ended this Canadian blog with a bang, these cookies were amazing, I would even have to say, the best cookies that we've baked so far on this blog. That's not to say that our other cookies were not good, because they were, but these chai gingerbread cookies came out perfectly, not even Ana could find fault in them.

Our cookie decor was not that great, but we still had fun decorating them. My only advice would be to use royal icing. It's thicker and easier to work with when decorating cookies. We decided to make these cookies last minute, so we had to improvise and use water and confectionar sugar which makes for a runny icing mix but Ana was able to make the outline of the cookies and we used whatever candy we had on hand for the decor.

To wrap things up, these cookies are awesome, and you absolutely have to try this recipe out. And as the famous poem goes: "Happy Christmas to all, and to all a good night!"

Ana's Thoughts

One word: yumy! These cookies are fantastic. Best gingerbread cookies evah! haha I've had gingerbread cookies before and they were not even close to these ones we've baked. They will be my go-to gingerbread cookies from now on. Super easy to make, super fast - 10 min. tops - and no need refrigerating after cutting, that's a plus for me. And they are delicious - did I mention that already? What else do you want from a gingerbread cookie? Go make them. Now. =)

This is our last post of the year. =( Unfortunately, our busy schedules - haha-  won't allow more baking, but we'll be back next year with tons of tasty goods for you. We here at OSSD wish you all a Sweet Xmas and a wonderful New Year, full of joy, peace, love and cookies!...and cakes...and chocolate...and pies..... =D
Identification: Mr. Gingerbread Man
Cause of death: Yummyness
See you soon!

Tuesday, December 7, 2010

We are so excited to present a very special entry this week. On Friday, December 2, 2010, we got the opportunity to meet one of our favourite food bloggers, Angie Dudley, who is famously known as Bakerella. Her cake pops have been loved by thousands of people across North America and around the world. She has been on the Martha Stewart show, and is currently touring across the nation, promoting her book: Cake Pops.

Since we had the opportunity to meet the queen of cake pops, it only made sense that we make our own batch. We made Bakerella's classic cupcake pop, which are alike mini cupcakes on a stick. Pretty sweet huh?


The instructions for cake pops are pretty long, so below is the link to the cupcake pops on her blog. You'll have fun making these pops, we promise!

Cupcake Pops


You will need:
1 box cake mix of your choice
1 can ready made cream cheese frosting
Wax Paper
Lolipop sticks
Candy melts (Purple and Light Cocoa, for us)
Sprinkles
Smarties/M&M's
Flower cookie cutter (1.25" is the best)


Instructions
Click here for detailed instructions (with photos and a video).


Ann's Thoughts:


It was Ana who first introduced me to Bakerella. So it was perfect timing that Bakeralla came to Toronto last week Friday and Saturday for a book signing of her recipe and guide book to making cute but delicious cake pops. Ana and I came about half an hour early anticipating her arrival, and I have to admit that we were both star struck at her presence. Overall it was a great experience to meet her, and it inspired us and renewed our passion for baking.


At first Ana and I were going to make snowmen pops just so it ties in with the whole winter, December, Christmas theme. Well, let's just say we later had some reservations of making something so artistically "complicated" (we were afraid of being too ambitious like we were when we made the spiders for our Halloween addition), so we decided on making her classic cupcake pops. Making these cupcake pops are not all that hard. The difficult part was finding the mini flower shape cookie cutter required for the shape of the cupcake. All together Ana and I went to about six different stores until I was able to find one in Michael's, which Ana said is a bit big...so for those who are interested in making cupcake pops, good luck finding the cookie cutter!

Not only were the cupcake pops cute, but they were so good. I gave my share of cake pops out to a few of my co-workers and it was a hit. These mini cakes are fun to make, and I'm already gearing up to making another batch later on this week.

Ana's Thoughts:

After a (long) hiatus we are back in the kitchen and with a super special recipe and post. Last week we had the pleasure to meet one of the most talented blogger out there. Bakerella! She came to TO as part of her book tour and we couldn't miss the opportunity. So off we went to one of her two book signings ( I had the chance to go on both =D ). The first one was held at Teatro Verde. It was a small signing. She was so nice with everybody, always smiling and chit chatting with her readers (fans?). Sadly, the only thing yours truly was able to mutter was "Hi. Nice to meet you." Creative, I know. XD Oh, and we have the chance to meet another blogger, Sweetopia! Her blog is amazing and her cookies are awesome. It was a great day for this blogger here. =)

The next day, I went to Williams Sonoma to her second signing. I was a little surprised to see so many people there. The second floor of the store was crowded with people, all of them holding their (fancy) cameras and snapping shots like crazy, trying to document every moment. She talked about how she started with the cake pops, the blog, a little bit about photography, and why the name Bakerella. You can read in details here.

After the signings I was very excited to make the cake pops. Bakerella's book provides step by step photos and she gives tons of tips along the way to help you get the perfect cake pops so I was feeling confident. It's a little time consuming and you have to plan ahead but it's very fun and easy! Well, aside from molding the pops that is. I had trouble shaping them. It's not that they are complicated, I think the problem is with me - Ann had no problems with it. In fact, she was the one who molded all the cake pops. I guess I need to practice.

Coating the pops were a little tricky - our candy melts were a little thick, even after we added some vegetable oil in it, but in the end our pops turned out pretty cute. This was the cuttest thing we've ever made for the blog. =D Ooh, and they tasted good, too!


Tuesday, November 23, 2010

Our next love to baking cookies, cakes, and cupcakes, are visiting bakeries that serve their own amazing delicious treats. So many bakeries in the T-dot, and not enough time to visit them all, we chose two bakeries that stood out for us which we've reviewed by judging and comparing them based on quality of the product, service/atmosphere, and pricing. Our two contenders were OMG Baked Goodness Ltd. and LeaH's.


OMG Baked Goodness
The Stats
Location: 1561 Dundas Street West
Owner: Lesley Mattina
Website: http://www.omgbakedgoodness.com/
Famous for: Chocolate Vegan Cupcake


Ann's Thoughts


I had seen this bakery a few months ago when I was walking down Dundas Street West, and what drew my attention was the quirky pink and black sign "OMG baked Goodness." I was curious to check out what this bakery had to offer, which was why Ana and I chose this one as our review, arbitrary I know, but it has received rave reviews and publicity from blogto, the Toronto Star, OurFaves.com, and many more.


The selection at OMG was disappointingly small. It had a couple of cupcakes, some biscotti, a few cookies and scones. Ana and I both selected the chocolate vegan cupcakes at $2.50 each, which is the signature item from this bakery. So how was the cupcake? It was soooooo good, I totally was not expecting it. It wasn't dry, or dense, and I definitely cannot taste the difference between a vegan cupcake versus a non-vegan cupcake. The only question is: Since the cupcakes at OMG do not have butter and eggs, does that mean it's (close to) fat-free????


Quality of Product: 10-'Nough said!
Service/Atmosphere: 7-The girl who served us was nice and didn't pester us much when we were trying to decide on which cupcake (yeah right!) we would chose. However I found the place rather sterile, with uncomfortable wooden benches, and no music, you wouldn't want to stay inside for long.
Pricing: 8-Although for some people $2.50 (+ tax) may seem a lot for a cupcake, it's totally worth it, trust me!


Ana's Thoughts


Hmm cupcakes. Who doesn't love them? I certainly do. And OMG cupcakes doesn't disappoint. They are moist, fluffy, bigger than most cupcakes out there and, according to Ann, they are healthy -vegan food does not contain butter nor eggs. I like to think she's right. Let's pretend the super sugary frosting is healthy too, ok? hehe =) Oh yeah, the frosting was the only thing I didn't like. It gives the sweetness the cake needs but I thought it was overly sweet. But this was not a surprise for me because I usually don't like butter cream frosting. FYI my cupcake is the one with the pink frosting.

Quality of Product: 9- The cupcake itself deserves a 10 but because of the frosting, which I suspect wasn't fresh - it was grainy and dry - I will give it a 9.
Service/Atmosphere: 7- I'll make Ann's words mine. And with the huge space they have some tables and comfortable chairs wouldn't hurt. A good coffee machine would be good, too. With this weather, it would help bring more customers inside but I guess they don't want people to stay long, chatting and eating their goods. Go figure.
Pricing: 8- Good value for the cupcake, but not so much for the other goods they have in store, specially for the tiny, skinny biscotti.

LeaH's

The Stats
Location: 621 St. Clair Avenue
Owner: Leah Kalish
Website: Not available
Famous for: Biscotti


Ann's Thoughts


From the outside looking in, I think this bakery is so attractive. Although small, it looks very cosy and inviting. It was on Ana's list of places to visit in Toronto, so instead of just visiting, why not do a comparative review as well?

After having bunch at CocoaLatte which consisted of waffles topped with strawberries, bananas, and whipped cream drizzled in maple syrup (oh the sugar!!!!) we briskly walked two blocks down to LeaH's for more sugary treats. In this bakery there was an assortment of baked goods such as cookies, biscotti, cupcakes, nata tarts, scones, chicken pot pie, and the list goes on, it took Ana and I a while to decide exactly what we were going to have.

LeaH is known for biscotti, which the owner, Leah Kalish sells in grocery stores around Toronto. I bought the cranberry and orange biscotti as well as the double chocolate biscotti, which cost me $1.25 each. Ana selected the lemon poppy seed biscotti, as well as her version of the oreo cookies, and a chocolate peanut butter rice crispy squares. Being allergic to the latter item, I tried all three biscotti as well as the oreo cookie. The biscotti was good. Out of the three I preferred the double chocolate. The oreo cookie did not taste like an oreo cookie (nobody can copy Mr. Christie) but they were still good.

Quality of Product: 7-The food was okay.
Service/Atmosphere: 6-The lady who served us was rather impatient (even though she wasn't doing anything.) The bakery itself was very cute, but because it was small, only a few people at a time can actually go there, and fewer can actually stay inside to eat.
Pricing: 9- I forgot the prices for the other stuff, but at $1.25 per biscotti, it's a really good deal.

Ana's Thoughts

We finally had a chance to go to LeaH's! Yay. The goods I had was a Lemon Poppy seed biscotti, Homemade Oreo cookies and a Chocolate Peanut Butter rice crisppy square. My favorite was the Lemon Poppy seed biscotti. I don't know what's considered a good biscotti but the lemon poppy seed was delicious. I will definitelly try to make it at home. The orange cranberry was my second fav. - hm, I see a citrus pattern here.

I don't know why the homemade oreos are called oreos. It tasted nothing like the store bought - of course- and the cookies were crunchy and very thin. It was good, nonetheless. I'm a huge lover of rice crispies so of course I had to have the Chocolate Peanut Butter at LeaH's. It was very good, crunchy with tiny bits of marshmellows in it. I coudn't taste the peanut butter, though. Just a teeny tiny hint of it.

Quality of Product: 8 1/2 - All the goods we had were great. Even though the Oreo cookies didn't taste like Oreos or the Peanut butter rice crispy only had a hint of peanuts, they still tasted very good.
Service/Atmosphere: 6-The lady wasn't very friendly with the customers and that's a big no no for me. What's the problem with smilling a little and making an effort to make people feel welcomed? It would make me hang out there more, even though they have such a limited space.
Pricing: 9- All the goods we had have a reasonable price.


PS: If your mouth filled with water when Ann mentioned out brunch at Cocoa Latte, here's a picture to make you drool. ;)


Tuesday, November 9, 2010

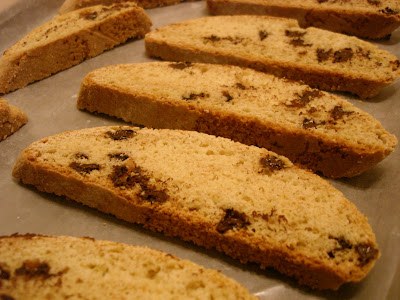
We consider biscotti as being the grown up version of cookies. These narrow crispy cookies are perfect for dipping in one's tea or coffee. For those who have not heard of biscotti, they come from Italy and originally are almond flavoured, but today come in a vast array of flavours such as dark or white chocolate, lemon and poppy seed, and espresso flavour, just to name a few. We've chosen to stick with tradition and do a vanilla and almond biscotti and we made a batch of chocolate chip biscotti for those with nut allergies. The vanilla and almond recipe was taken from food stylist and author Donna Hay. Changes we have made to the recipe are written in italics. So bake, eat, and enjoy.
Vanilla Almond + Chocolate Chip Biscotti
Slightly modified from our beloved book
2 cups plain all-purpose flour
1 1/2 teaspoon baking powder
3/4 cup blanched almonds (we used 1/4 cup)
3 eggs
2 1/2 teaspoons vanilla extract
1/4 cup dark chocolate chip

Preheat hte oven to 160ºC (325ºF).


Place flour, baking powder, sugar in a bowl and mix together.

Add the eggs and vanilla and mix well to form a dough. (You can use your hands. It's easier.)
Divide the dough in two.

Place the dough on a lightly floured surface and knead each piece until smooth.


Add the chocolate chips to one of the dough and the almonds in the other one and knead again.

Shape into logs and flatten slightly. Place the logs on a baking tray lined with non-stick baking paper and bake for 35 min.
Remove from the oven and allow to cool completely.

Cut the logs into 5mm thick slices and place on a baking tray lined with non-stick baking paper.
Bake for 10-15 min. or until the biscotti are crisp. Store in an airtight container and serve dunked into espresso coffee or liqueur.
Makes 40.


Ann's Thoughts


Biscotti has to be the most time consuming batch of cookies I've ever made because it consists of baking it, then waiting for it to really cool down, and then re-bake it again-so I'd say it takes about an hour and a half to make, compared to the average cookie which takes ten, twelve, fifteen minutes to bake? Anyway if you do decide to make these cookies, plan accordingly because they do take time to make.


This recipe is suppose to yield 40 biscotti, but the way Donna Hay makes them are way too thin. We made ours thicker and ended up with half that amount.


Our batch did not come out the way we wanted them to (see Ana's comments below). But it was an honest mistake, which I've made a couple times before on this blog. Next time we bake this, we'll get it right.


Ana's Thoughts


Disappointed. I'm so disappointed. With myself. I messed up this recipe. =( Such an easy recipe and with just a few ingredients and I managed to spoiled it. I put baking soda instead of baking POWDER. Damn you English and my lack of attention! I'm starting to think that we here at OSSD definitely don't get along very well with baking powder/soda.


Because of this little mistake our biscotti had a bitter aftertaste. =s Such a shame. Everything else went well, though. They were very easy to make. I'll definitely be making them again.


Try it. You will love it. Just remember: baking POWDER, not baking soda!

'Til next week!
;)


Receita em Português
Biscotti de baunilha e amêndoas e gotas de chocolate
2 xíc. de farinha
1 1/2 col. (chá) de fermento em pó
3/4 xíc. de açúcar
3/4 xíc. de amêndoas, sem casca (Nós usamos somente 1/4 de xícara.)
3 ovos
2 1/2 col.(chá) de extrato/essência de baunilha
1/4 de xíc. de gotas de chocolate meio amargo (Opcional)


Preaqueça o forno a 160ºC.
Numa tigela grande, junte a farinha, o fermento e o açúcar. Acrescente os ovos e a baunilha e misture até formar uma massa. Divida a massa em duas.
Em uma superfície levemente enfarinhada, sove as massas por aproximadamente 1 minuto, acrescente as amêndoas em uma das massas e as gotas na outra. Sove mais um pouco.
Role a massa até que fique parecida com uma baguete média. Coloque em uma assadeira de beiradas baixas forrada com papel manteiga e leve ao forno por 35 minutos. Retire do forno e deixe esfriar completamente.
Corte as "baguetes" em fatias de 5 mm e leve para assar por mais 10-15 minutos ou até que fiquem crocantes, na mesma assadeira.
Rende 40.

Monday, November 8, 2010

Happy B-Day Ann!!!

Today's Ann's birthday! Yay! So let's sing happy birthday together! (insert lot's of people singing happy birthday awkwardly and out of sync here.)

I wish you all the best!
Hope you have a great day! 
Oh, and go buy something nice for you. You deserve it. =D

Ana.

.
.
.
New post out tomorrow!
The chocolate cake caught your eye?? Stay tunned for next week's post! ;)


Tuesday, November 2, 2010

We've made items that have orginated from Brazil, Greece, and the United States, but were feeling rather Britsh this week, and what better recipe to represent the UK than scones. Made salty or sweet, scones make a yummy mid-day snack. So invite some or your mates over and have some rapsberry scones over tea.

Raspberry Scones

Makes 8 scones

Ingredients

2 cups (260g) all purpose flour
1/3 cup (65g) granulated white sugar
1 teaspoon baking powder
1/2 teaspoon baking soda
1/4 teaspoon salt
6 tablespoons (75g) unsalted butter, cold and cut into pieces
2oz dark chocolate chunks or chips (1/2 cup or 50g) (optional)
3/4 cup fresh or frozen raspberries (we used fresh ones)
1/2 cup (120ml) whole milk plain yogurt
1 teaspoon pure vanilla extract (or just the regular vanilla)
1 large egg, lightly beaten

Directions

Preheat oven to 375ºF (177ºC), and place rack in the middle of the oven. Line a baking sheet with parchment paper.

In a large bowl, whisk together the flour, sugar, baking powder, baking soda and salt. Cut the butter into small pieces and blend into the flour mixture with a pastry blender or two knives. (Fingertips work just fine, too). The mixture should look like coarse crumbs. Stir in the chocolate chunks and raspberries. In a small measuring cup whisk together the yogurt, vanilla, and egg. Add this mixture to the flour mixture and stir just until the dough comes together. Do not over mix.


Transfer to a lightly floured surface and knead the dough gently four or five times and then pat, or roll, the dough into a circle that is about 7 inches (18cm) round and about 1 1/2 inches (3.75 cm) thick. Cut the dough into eight triangles. Place the scones on the baking sheet.


Bake for about 18-20 minutes or until golden brown and a toothpick inserted in the middle comes out clean. Remove from oven and place on a wire rack.

Although not necessary, if you want the tops of the scones to be crispy, then turn your broiler on high. Sprinkle confectioners sugar over the tops of the scones and place them under the broiler. Broil for just a few seconds, turning the pan as necessary, until the sugar has melted and turns golden brown. Make sure to watch the scones carefully as the sugar will burn very quickly. Transfer to a wire rack to cool.


Ann's Thoughts


Our originally plan this week when we decided to make the raspberry scones, was to use the left over frozen raspberries we had used a couple of months ago for our Lemon Raspberry Swirl Pound Cake. However, when we saw how disintegrated the frozen raspberries were, we decided it was better to use fresh fruit. What we were trying to avoid was a batch of scones that had mashed raspberries rather than semi-formed ones which we could sink our teeth in and actually taste the fruit. In my opinion, it is very difficult to bake very fragile fruits such as berries within pastries and expect them to keep in shape no matter how careful one tries to mix the batter. Our batch of scones looked like it took a beating, being bruised black and blue. Sounds gruesome, but Ana and I were surprised with the results especially since our scones looked nothing like the one on the Joy of Baking - I sense Photo Shop had a hand with their scones.


Speaking of photos, this week's photo shoot was rather frustrating because most of the photos that we've took in previous entries were done outside. However, since the weather is gradually changing, the amount of daylight we've been getting has been gradually decresing. By the time we meet up, bake, and scramble to get outside to take the pics, it is pretty dark out. We're trying to find new (but cheap) methods in taking great photos of our baked goodies and hopefully we can figure out something for next week's recipe.


Ana's Thoughts

It was my first time making scones so I was a little apprehensive as how things would turn out. Specially because I've heard that scones can be a little tricky. But after reading the well-written Joy of Baking instructions I became more confident and saw that scones are very simple to make. You just have to follow a few steps, like using super cold butter and not over kneading the dough. (Just knead until the dough comes together, with no loose crumbs.)

The final result was a success. They turn out very good. Moist, light, tasted like our pound cake but more crumbly. Perfect for breakfast. Can't wait to try new flavours. Hmmm. Oh, and they are super fast to make, too. I think it took us 15 minutes to put the dough together and 20 more minutes to bake them.


See ya'll next week. ;)

Receita em Português

Scones de Framboesas

2 xíc. (260g) de farinha de trigo
1/3 xíc. (65g) de açúcar cristal
1 col. (chá) de fermento em pó
1/2 col. (chá) de bicarbonato de sódio
1/4 col. (chá) de sal
6 col. (sopa) (75g) de manteiga sem sal, gelada e cortada em pedaços pequenos
1/2 xíc. (50g) de chocolate picado ou em gotas (opcional)
3/4 xíc. de framboesas frescas ou congeladas
1/2 xíc. (120ml) de iogurte integral
1 col. (chá) de extrato de baunilha
1 ovo grande, ligeiramente batido

Preaqueça o forno a 177ºC. Forre uma assadeira retangular rasa com papel manteiga.

Em uma tigela grande, peneire a farinha, o açúcar, fermento, bicarbonato e o sal. Junte a manteiga e amasse com a ponta dos dedos até formar uma farofa úmida. Acrescente o chocolate e as framboesas. Em um copo medidor, junte o iogurte, a baunilha e o ovo. Adicione à farofa e misture até combinar. Não misture demais.

Transfira para uma superfície levemente enfarinhada e sove a massa levemente, 4 ou 5 vezes. Abra a massa (com as mãos mesmo) até formar um círculo de aproximadamente 18 cm de diâmetro e 4 cm de altura. Corte em 8 triângulos e coloque na assadeira.

Asse por 18-20 minutos ou até que um palito, quando inserido no centro, saia limpo. Retire do forno e deixe esfriar em uma grade.


Monday, October 25, 2010

*Quick note*
I know it has been a while that we've been writing this blog but I still can't figure Blogger text formating out. I think it has a life of its own, 'cuz in every post the spaces between paragraphs are different. *sigh* So don't mind the loooong gaps. Ana.
*End of Quick note*

So what is the the best thing about Halloween?
Dressing up in the most scariest, wildest, funniest, cutest costumes ever?
Scaring others or receiving a fright fest from scary movies, haunted houses, etc?
Eating tons of candy?
All of the above?

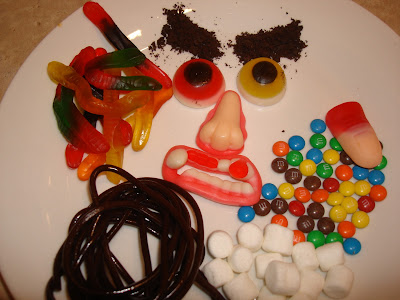
Everybody has a different reason for what makes Halloween so great and even though as adults we (apparently) aren't allowed to collect our own stash of candy, we can find other ways to participate, such as baking our own treats. We turned to the queen of Halloween recipes, Martha Stewart, whose array of creative Halloween recipes from cookies to cocktails got us excited. We baked devil's food and pumpkin cupcakes, which are very fitting for the season, and decorated them into scary spiders and worms. Changes to the recipe are made in italics. Happy baking, and have a very spooky but fun filled Halloween!

Halloween Cupcakes


Spider Cupcakes
Original idea from here


Ingredients


Devil's food cupcakes (See recipe below)
Black sanding sugar (we used chocolate cookie crumbs)
1 bag cinnamon candy (we substituted this with mini red M&M's)
1 bag marshmallows
1 bag black licorice (we substituted this with No Name grape flavoured string candy)


Directions
1. Make Devil's food cupcakes.


2. Ice mini cupcakes with whipping cream (or your favourite icing) and coat with sanding sugar/chocolate cookie crumbs. Use cinnamon candy/mini M&M's for eyes. For legs, attach 8 pieces of black licorice/grape string candy. For fangs, cut out tiny cone shapes from a marshmallow and attach.


*Devil's Food Cupcakes
From here

Ingredients


3/4 cup unsweetened Dutch-process cocoa powder (we used regular cocoa powder)
3/4 cup hot water
3 cups all-purpose flour
1 teaspoon baking soda
1 teaspoon baking powder
1 1/4 teaspoon coarse salt (We used regular table salt)
1 1/2 cups (3 sticks) unsalted butter
2 1/4 cups sugar
4 large eggs, room temperature
1 tablespoon plus 1 teaspoon pure vanilla extract
1 cup sour cream, room temperature


Directions


1. Preheat oven to 350 degrees. Line mini muffin tins with paper liners. Whisk together cocoa and hot water until smooth. In another bowl, whisk together flour, baking soda, baking powder, and salt.


2. Melt butter with sugar in a saucepan over medium-low heat, stirring to combine. Remove from heat, and pour into a mixing bowl. With an electric mixer on medium-low speed, beat until mixture is cooled, 4-5 minutes. Add eggs one at a time, beating until each is incorporated, scraping down sides of bowl as needed. Add vanilla, then cocoa mixture, and beat until combined. Reduce speed to low. Add flour mixture into two batches, alternating with the sour cream, and beating until just combined after each.


3. Divide batter evenly among lined cups, filling each 3/4 full. Bake, rotating thins halfway through, until a cake tester (or a toothpick) inserted in centers come out clean, about 20 minutes. Transfer tins to wire racks to cool 15 minutes, turn out cupcakes onto racks and let cool.

*We don't exactly know how much this recipe yields and it is not specified on the site. See Ann's comment below.


Pumpkin Cupcakes
From here
Makes 18 (We halved the recipe and ended up with 12)


Ingredients


2 cups all-purpose flour
1 teaspoon baking soda
1 teaspoon baking powder
1 teaspoon coarse salt (or table salt)
1 teaspoon ground cinnamon
1 teaspoon ground ginger
1/4 teaspoon freshly grated nutmeg (we omitted this ingredient. Why? We simply didn't have any.)
1/4 teaspoon ground allspice (we omitted this one too, same reason as the nutmeg)
1 cup packed light-brown sugar
1 cup granulated sugar
1 cup (2 sticks unsalted butter, melted and cooled)
4 large eggs, lightly beaten
1 can (15 ounces) pumpkin puree

Halloween themed candy, orange and black jelly beans, sprinkles, etc...
Whipping cream, or your favourite icing. May we suggest the maple cream cheese frosting that we used in our pumpkin cake recipe.


Directions


1. Preheat oven to 350 degrees. Line cupcake pans with paper liners; set aside. In a medium bowl, whisk together flour, baking soda, baking powder, salt, cinnamon, ginger, nutmeg, and allspice; set aside.


2. In a large bowl, whisk together, brown sugar, granulated sugar, butter, and eggs. Add dry ingredients, and whisk until smooth. Whisk in pumpkin puree.


3. Divide batter evenly among liners, filling each about halfway. Bake until tops spring back when touched, and with a toothpick inserted in the center comes out clean, 20-25 minutes, rotating pans once if needed. Transfer to a wire rack; let cool completely.


4. Spread whipping cream/frosting and decorate with desired candies.


Ann's Thoughts


57: Ana and I ended up making fifty-seven cupcakes! There were cupcakes everywhere, on the desk, by the fireplace mantle, on the dinning room table, all over the kitchen, I wouldn't be surprised if there are a few cupcakes hiding in Ana's bedroom. I partly blame this on Martha Stewart. She or whoever published the devil's food cupcake on her site did not record how much cupcakes the batter contained, and it did not occur to us until added 1 1/2 cups of butter, and over 2 cups of sugar which seemed suspiciously a lot. We ended up making what seemed like an endless supply of devil's food cupcakes- it was like we were punked.


The theme for these Halloween cupcakes was bugs which consisted of spiders and worms....so worms aren't really scary at all, but when we saw an image of cupcakes infested with gummy worms it was too cute not to do. Decorating these cupcakes reminded me of doing arts and crafts in elementary school. The only thing is that it's not as easy as Ms. Martha makes it look. The legs for the spiders either fell off, destroyed the cupcake as we kept poking holes in them, or just looked weird. Ana was able to make only one pair of fangs our spiders because it was so time consuming. The worms were easier to make. Ana being the smart cookie that she is, inserted toothpicks inside the gummy worms and gently pushed them into the cupcakes so it looks like they are digging themselves inside the cupcakes.

This week I felt the emphasis was on decorating, however the devil's food cupcakes were literally sinfully delicious! Our pumpkin cupcakes were also really good. We didn't get a chance to decorate them (they were simply too many cupcakes to decorate) but they are the best pumpkin cupcakes I've ever tasted.


Ana's Thoughts


Oh Halloween, I wish you were a tradition in my country, too. Then I could eat...err have all the candies to decorate these cupcakes every year. Please come to my country. I'd appreciate it. Thank you.


Ok, enough with the wishful thinking. haha Making and decorating these cupcakes was really fun! The cupcakes themselves were pretty straightforward - be aware that if you choose to make the full recipe you'll end up with more than 50 cupcakes! We chose two different recipes, a pumpkin and a devil's food cupcake. A devil's food, how appropriate. Haha. We here at OSSD think about every detail. Anyway, they were really tasty, specially the pumpkin. Mmmm


I had so much fun decorating them! I wanna do it again!


The only problem for us this week was the pictures. We usually do all the photo shoots with natural light but this week we had to do it inside the house because it was already dark outside, not to mention cold. So they didn't turn out the way we wanted. =S


Anyway, Happy Halloween!! Eat lots of candy, dress up with a funky costume and make these cupcakes!

See you next week. ;)


Receitas em Português


Devido à preguicite aguda, essa semana não postarei as receitas traduzidas. Se tiver interesse por alguma das receitas (Cupcakes de abóboras ou Cupcakes de Chocolate) é só deixar um comentário abaixo. =)